
More Than Just a Wall Treatment
Wainscoting is a decorative wall paneling that typically covers the lower third of interior walls, combining both functional protection and timeless aesthetic appeal. Originally developed in 14th century Holland, this architectural feature served to protect walls from scuffs and provide insulation against cold, damp stone walls.
What is Wainscoting?
- Definition: Decorative wood paneling applied to the lower portion of interior walls
- Height: Usually covers one-third of wall height (about 33 inches on 8-foot ceilings)
- Components: Baseboard, panels, stiles, rails, and chair rail cap
- Materials: Wood, MDF, PVC, or polyurethane
- Cost: $1,050-$1,600 average installation cost
Today’s wainscoting goes far beyond its humble protective origins. It adds architectural interest to any room while maintaining its practical benefits of wall protection in high-traffic areas. Whether you choose traditional raised panels for formal elegance or modern flat panels for clean lines, wainscoting transforms ordinary walls into sophisticated design features.
As interior designer Heidi Caillier notes, wainscoting is appreciated “for the budget-friendly statement it makes” and can help make new homes “feel more established.” The versatility of materials – from budget-friendly MDF at $1 per square foot to premium solid wood at $40 per square foot – makes this classic feature accessible to homeowners at every budget level.
For real estate investors and homeowners, wainscoting represents a smart improvement that improves both aesthetic appeal and property value. Its timeless nature means it never goes out of style, making it a safe investment for any home improvement project.

Basic wainscoting glossary:
Understanding the Types and Materials of Wainscoting
Choosing the right wainscoting for your home is like picking the perfect outfit – it needs to match your style, fit your budget, and work well in the space you have. The good news? There are plenty of options to suit every taste and situation.
| Material | Cost per sq. ft. | Durability | Moisture Resistance | Best Use Cases |
|---|---|---|---|---|
| Solid Wood | $10 – $40 | High | Moderate | Formal areas, living rooms, dining rooms, stainable finishes |
| MDF | $1 – $10 | Moderate | Low | Paint-grade applications, bedrooms, low-moisture areas, budget-friendly |
| PVC/Polyurethane | $5 – $20 | High | Excellent | Bathrooms, kitchens, mudrooms, high-humidity areas, exterior applications |
Exploring Popular Wainscoting Styles
Think of wainscoting styles as different personalities for your walls. Each one tells its own story and creates a unique mood in your space.
Raised Panel is the formal dinner party of wainscoting styles. With its beveled edges and panels that literally rise above the surrounding frame, it brings instant elegance and sophistication to any room. This traditional style was the go-to choice in Victorian homes, where showing off a bit was perfectly acceptable. If you want your dining room or living room to feel grand and established, raised panel wainscoting delivers that wow factor. Just keep in mind that those precise beveled edges usually need a professional touch to look their best.
Flat Panel takes a completely different approach – think casual Friday instead of black tie. Also called Shaker style, this clean-lined option features panels that sit flush or slightly recessed within their frames. Board and batten, a popular cousin of flat panel, uses simple strips of wood to create geometric patterns directly on the wall. This style is perfect for modern homes, farmhouses, or anywhere you want architectural interest without the fuss. The best part? It’s much more DIY-friendly than its fancy raised panel cousin.
Beadboard brings cottage charm wherever it goes. Those distinctive vertical grooves create a relaxed, welcoming feel that works beautifully in kitchens, bathrooms, or any space where you want to add texture without overwhelming the room. Designer Chloe Warner of Redmond Aldrich Design loves beadboard for its ability to make spaces feel both casual and refined. The vertical lines also have a sneaky way of making your ceilings look taller – a nice bonus in any room.
Picture Frame Moulding is the clever hack of the wainscoting world. Instead of installing actual panels, you simply apply decorative trim to create the illusion of traditional paneling. It’s incredibly versatile – you can make the “frames” large or small, square or rectangular, depending on your room’s proportions. This approach gives you the architectural interest of traditional wainscoting at a fraction of the cost and complexity.
Choosing the Right Material for Your Project
The material you choose for your wainscoting project will determine not just how it looks, but how well it performs and how much you’ll spend.
Solid Wood is the luxury option that never goes out of style. It can be stained to show off beautiful natural grain patterns or painted for a crisp, classic look. The downside? Your wallet will definitely feel it, with costs reaching up to $40 per square foot for materials alone. Solid wood also moves with humidity changes, which means it might develop small cracks over time if not properly installed. But for formal spaces like dining rooms where you want to make a lasting impression, nothing beats the real thing.
MDF (Medium-Density Fiberboard) is the budget-friendly hero of the wainscoting world. At as little as $1 per square foot, it makes this classic look accessible to almost any budget. This engineered material creates a perfectly smooth surface that takes paint beautifully, and it’s much more stable than solid wood. The catch? Keep it away from moisture. MDF and water don’t play well together – it can swell and deteriorate if it gets too wet. Stick to dry areas like bedrooms and living rooms, and you’ll be perfectly happy with the results.
PVC and Polyurethane materials are the superheroes of wet areas. Completely waterproof and resistant to mold, mildew, and rot, these synthetic options laugh in the face of bathroom humidity and kitchen splashes. They’re lightweight, easy to clean, and come ready to paint. While they don’t have the natural warmth of wood, their practical benefits in challenging environments make them the smart choice for bathrooms, mudrooms, and anywhere moisture is a concern. Elite Trim Works points out that vinyl beadboard is particularly advantageous in moisture-prone areas because it’s both waterproof and scratch-resistant.
The Financial and Value-Adding Benefits
When we’re considering home improvements, it’s natural to wonder about the bottom line. Will this investment pay off? With wainscoting, the answer is a resounding yes. This classic architectural detail offers both immediate visual impact and solid long-term financial benefits that make it one of the smarter upgrades you can make.

Calculating the Cost of Wainscoting
Let’s talk numbers. The question we hear most often is, “What’s this going to cost me?” According to Home Advisor cost data, the average cost for wainscoting installation falls between $1,050 and $1,600 for a typical room. That might sound like a big investment, but when we break it down, it becomes much more manageable.
Material costs make up a significant portion of your budget, but here’s where you have real control. Remember those MDF options we discussed? At just $1 per square foot, you can transform a room without breaking the bank. Even if you opt for mid-range materials, you’re looking at reasonable costs that fit most budgets.
Labor costs typically run $2 to $4 per square foot if you hire professionals. While this adds to the total, professional installation ensures those crisp lines and perfect joints that make wainscoting look truly custom. The pros bring expertise, proper tools, and the experience to handle tricky corners and uneven walls.
But here’s where things get exciting for DIY enthusiasts. Wainscoting is absolutely doable as a weekend project for many homeowners. By tackling the installation yourself, you can cut your total costs nearly in half. Simple styles like beadboard or flat panel are particularly DIY-friendly, and the sense of accomplishment is priceless.
Enhancing Your Home’s Value
Beyond the immediate joy of walking into a beautifully finished room, wainscoting delivers real value that shows up when it matters most – at selling time.
The aesthetic appeal is undeniable. Wainscoting instantly lifts any space from builder-basic to custom-designed. It signals to potential buyers that this home has been thoughtfully cared for and upgraded. That perceived value translates directly into market appeal and often justifies a higher asking price.
There’s also the practical side. Wainscoting provides genuine durability in high-traffic areas like hallways, dining rooms, and entryways. Those lower wall sections that typically show scuffs, scratches, and everyday wear? They’re now protected by your beautiful paneling. Buyers appreciate this functional benefit because it means less maintenance down the road.
Perhaps most importantly, wainscoting adds architectural interest that never goes out of style. Unlike trendy paint colors or fashionable fixtures, this classic feature has staying power. It’s been enhancing homes for centuries, and it will continue to do so for centuries more.
When you’re ready to sell, these thoughtful improvements make a real difference in how your home competes in the market. Real estate valuation and market analysis often highlight how details like quality wainscoting contribute to both faster sales and better final prices. It’s an investment that truly pays forward.
Design and Application: Where and How to Use Wainscoting
The beauty of wainscoting lies in its remarkable versatility. Gone are the days when this neat wall treatment was reserved only for grand dining rooms! Today, we can transform virtually any space in our home with the right approach to placement, height, and color.

Best Rooms for Installation
Dining rooms remain the classic choice for wainscoting, where it creates that perfect formal atmosphere for entertaining guests. As designer Chloe Warner points out, beadboard in dining spaces makes the area above feel “extra special.”
But let’s think beyond tradition! Hallways and entryways are fantastic candidates because they’re high-traffic zones that really benefit from the wall protection wainscoting provides. Every time someone brushes past with a backpack or bumps the wall with furniture, our wainscoting takes the hit instead of our paint.
Bathrooms might surprise you as a great location for this treatment. Designer Heidi Caillier specifically recommends wainscoting in bathrooms to “make the room feel softer” among all those hard surfaces. Just remember to choose PVC or polyurethane materials that can handle the moisture.
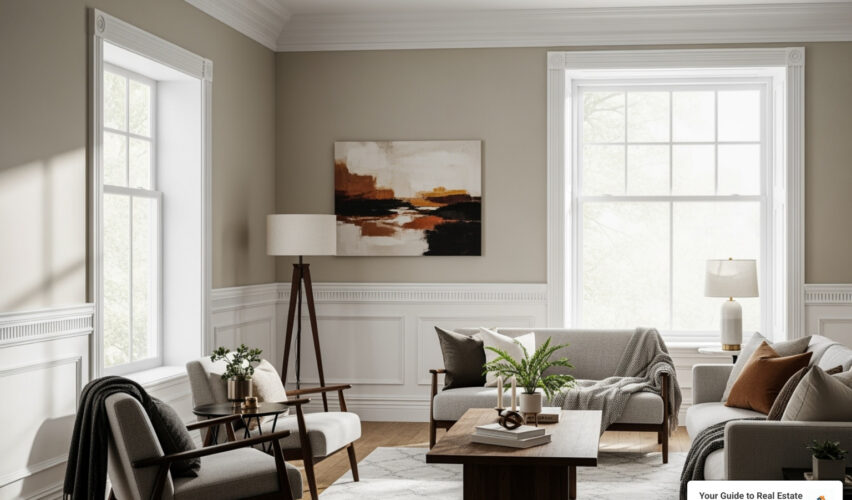
Bedrooms transform beautifully with wainscoting too. Whether we want a cozy cottage feel with beadboard or a more refined look with raised panels, it turns a plain bedroom wall into something special. Living rooms benefit from the architectural interest it provides, especially when we want to break up large wall expanses or define different seating areas.
Don’t overlook stairwells – they’re often forgotten spaces that become dynamic and visually interesting with wainscoting. The panels guide our eyes up and down while protecting against everyday wear from people going up and down the stairs.
Even kitchens and offices can gain significant character from well-placed wainscoting, particularly in areas prone to splashes or where chairs might scuff the walls.
Getting the Height Right for Your Wainscoting
Getting the height right is absolutely crucial for achieving that balanced, professional look we’re after. The rule of thirds is our golden guideline here, especially for standard eight-foot ceilings.
This means installing our wainscoting about 33 to 36 inches off the floor. According to Angi’s guidelines, this proportion creates visual harmony and feels naturally pleasing to the eye.
But here’s where it gets interesting – we don’t have to be rigid about this rule! Picture-frame molding and raised-panel wainscoting can work at various heights depending on our room’s proportions and the effect we want to create.
For rooms with very high ceilings, we might go taller with our wainscoting – perhaps 40 inches or even higher to maintain good proportions. Sometimes we might even choose full-wall application with materials like beadboard or shiplap, covering an entire wall to create a bold statement.
Here’s a mistake we definitely want to avoid: installing wainscoting exactly halfway up an 8-foot wall (at 48 inches). Many designers find this proportion visually awkward because it cuts the room in half rather than enhancing its height. Let’s stick with the rule of thirds or go intentionally much higher or lower for a distinct design choice.
Painting Your Wainscoting: Color and Finish
This is where our personal style really gets to shine! Most wainscoting materials – whether MDF, PVC, polyurethane, or solid wood – are designed to take paint beautifully, giving us endless creative possibilities.
Paintable materials like MDF and PVC come pre-primed and ready for our chosen color. Solid wood also paints wonderfully, though we might choose to stain it instead to show off that natural wood grain.
For a monochromatic look, we can paint the wainscoting, walls, and trim all the same color. This creates a sleek, modern flow that can actually make our room feel larger and more cohesive.
Contrast colors offer more drama and visual interest. The classic approach is crisp white wainscoting with a bold wall color above, but we can flip this too – dark wainscoting with lighter walls creates stunning sophistication. The Benjamin Moore blog suggests getting bold with moody darks like green, blue, or even dramatic purple for real impact.
Neutral grays and earth tones provide subtle elegance that works with almost any decor style, while pastels can create a welcoming, cheerful atmosphere when paired with white.
The paint sheen matters too. Satin gives us a soft, subtle finish that’s easy to clean and durable for everyday use. Semi-gloss provides higher durability and easier cleanup – perfect for high-traffic areas like hallways and bathrooms. Benjamin Moore recommends their Advance® Interior paint for that furniture-like finish on wainscoting.
Here’s a fun option: if we love the look but don’t want to install actual panels, we can create “feign-scotting” using two-tone paint to mimic the visual division of real wainscoting. It’s budget-friendly and still gives us that distinctive style!
A Beginner’s Guide to DIY Installation
The idea of installing wainscoting ourselves might seem intimidating at first, but here’s the encouraging truth: it’s actually a very manageable weekend project that can deliver stunning results. We’ve seen countless homeowners successfully tackle this upgrade, and with some careful planning and the right approach, you can absolutely join their ranks.

Step-by-Step Installation Process
Let’s walk through this process together, breaking it down into manageable steps that won’t overwhelm you.
Getting Started: Planning is Everything
Before we touch a single tool, we need to plan thoroughly. This isn’t the fun part, but it’s absolutely the most important part of your wainscoting project. Start by choosing your style – whether it’s the clean lines of flat panel, the charm of beadboard, or the elegance of picture frame molding.
Next, determine your height using that trusty rule of thirds we discussed earlier. For most 8-foot ceilings, this means marking a line at about 33 inches from the floor. Use a level to mark this line lightly around the entire room – trust us, this reference line will be your best friend throughout the project.
Take time to sketch out your design, paying special attention to obstacles like electrical outlets, windows, and doors. If you’re doing picture frame molding, plan your box spacing carefully, aiming for even gaps of about 3-4 inches apart and keeping at least 2 inches from wall ends.
Gathering Your Tools and Materials
You’ll need some basic tools, but nothing too specialized. A measuring tape, level, and pencil are essentials. For cutting, a miter saw gives you the most precise cuts, though a jigsaw works for more intricate cuts around obstacles. A nail gun – either pneumatic or cordless – will make installation much faster and more professional-looking than hand nailing.
Don’t forget construction adhesive, wood filler, sandpaper, a caulk gun with paintable caulk, and of course, your primer and paint. Having everything ready before you start prevents those frustrating mid-project trips to the hardware store.
The Installation Dance
Now comes the satisfying part! Start with your baseboard if you’re replacing the existing one, or install the bottom rail of your wainscoting system. Apply construction adhesive to the back and secure it with your nail gun, making sure to hit wall studs for the strongest hold.
For full panels like beadboard, apply adhesive to the back and nail them into place, constantly checking with your level to ensure everything stays straight and plumb. If you’re doing a flat panel or picture frame style, install your vertical stiles first, then add the horizontal rails, using your level religiously to maintain perfect alignment.
The chair rail goes on last, and this is where that reference line you marked earlier becomes crucial. Align it perfectly with your marked height, and again, use both adhesive and nails for a secure installation.
Making It Look Professional
Here’s where we separate the amateur jobs from the professional-looking installations. Use wood filler to cover every nail hole and any minor imperfections. Let it dry completely, then sand everything smooth – this step makes a huge difference in the final appearance.
Caulking is your secret weapon for that seamless, built-in look. Apply a thin bead of paintable caulk along all seams where your wainscoting meets walls, floors, and ceilings. Take your time here – good caulk work is what makes DIY projects look like they were done by pros.
Once everything’s dry, prime all the newly installed surfaces, then apply two coats of your chosen paint. The change will be remarkable, and you’ll have that satisfying feeling of having done it yourself.
Common Mistakes to Avoid
Let’s be honest – even experienced DIYers make mistakes, and wainscoting projects have their own particular pitfalls. The good news is that knowing about these common issues ahead of time can save you significant headaches.
The Height Trap is probably the most common mistake we see. Installing wainscoting exactly halfway up an 8-foot wall might seem logical, but it creates an awkward visual proportion that most designers find unappealing. Stick to that rule of thirds, or if you want to go dramatically higher or lower, make it an intentional design choice.
Measurement Mayhem can derail your entire project. We can’t stress this enough: measure twice, cut once. Use a reliable tape measure and level consistently throughout the project. Inaccurate measurements lead to gaps, misaligned panels, and wasted materials that can turn a weekend project into a week-long ordeal.
Spacing Slip-ups are particularly noticeable with picture frame or flat panel styles. Inconsistent spacing between panels or battens will be glaringly obvious once everything’s painted. Plan your layout carefully and use spacers to ensure uniformity – your eye will immediately notice if one section is slightly different from the others.
Prep Work Shortcuts might seem tempting when you’re eager to see results, but they always come back to haunt you. Skipping proper wall cleaning, sanding, or caulking will compromise your final finish. Paint needs a clean, smooth surface to adhere properly and look professional.
The Level Problem is something many beginners underestimate. Walls and floors are rarely perfectly straight, even in newer homes. Always use a level when installing each piece, even if it means compensating slightly for an uneven floor. What looks “close enough” during installation will look obviously crooked once everything’s painted.
Finally, Material Mismatching can cause real problems down the road. Using MDF in a high-moisture bathroom, for example, is asking for trouble. Always choose materials appropriate for your room’s environment – it’s much easier to select the right material upfront than to replace damaged wainscoting later.
By taking your time, planning thoroughly, and avoiding these common pitfalls, you’ll end up with beautiful, professional-looking wainscoting that improves your home’s value and your own sense of accomplishment. The weekend you spend on this project will pay dividends for years to come.
Frequently Asked Questions about Wainscoting
We love talking about wainscoting with homeowners, and over the years, we’ve noticed the same thoughtful questions coming up again and again. These questions reflect how much people care about getting their project right – and we’re here to help you feel confident about your decisions.
What was the original purpose of wainscoting?
Here’s something fascinating: wainscoting wasn’t originally about looking fancy at all! Back in medieval Europe, people had a very practical problem. Their homes had cold, damp stone walls that made rooms uncomfortable and drafty. Smart builders came up with a solution – wood panels on the lower portion of walls.
These wooden barriers served three crucial purposes. First, they provided much-needed insulation against those chilly stone walls. Second, they protected walls from the daily bumps, scuffs, and stains that happen in busy households. Third, they helped prevent “rising damp” – moisture that would creep up from the ground and damage walls.
The Moulding Company explains it perfectly: wainscoting was “conceived of a thin barrier to help protect walls from scuffs and stains, and it served as an extra layer of insulation from traditionally damp and cold stone or wooden walls.”
As homes became more comfortable over the centuries, wainscoting evolved from purely practical to beautifully decorative. Those elaborate Victorian designs we admire today? They started as simple wall protection that gradually became a symbol of craftsmanship and elegance.
Does wainscoting make a room look bigger or smaller?
This is probably our most popular question, and we have great news! When done thoughtfully, wainscoting typically makes rooms feel larger and more spacious, not smaller.
The magic happens through visual tricks that work with how our eyes naturally move around a room. When we install wainscoting at the traditional one-third height, it creates a horizontal line that draws the eye upward. This makes ceilings appear higher than they actually are – especially effective when we use contrasting colors between the lower panels and upper walls.
Wainscoting also adds depth and texture to flat walls, making rooms feel more substantial and interesting. Instead of staring at a plain, boring wall, your eye has architectural details to explore. This complexity actually makes spaces feel more generous, not cramped.
For an even more expansive feel, we can paint both the wainscoting and upper walls in the same color family. This creates a seamless, flowing look that visually enlarges the room. It’s like wearing a monochromatic outfit – everything flows together beautifully.
The only time wainscoting might make a room feel cozier is if we choose very dark colors in an already small space. But even then, “cozy” isn’t necessarily bad – sometimes that’s exactly the warm, intimate feeling we’re going for!
Is wainscoting considered outdated?
Not at all! This might be the easiest question we answer. Wainscoting is the opposite of a passing trend – it’s a timeless architectural feature that adapts beautifully to every era.
Interior designer Erin Conway from Kismet House puts it perfectly: “wainscoting is timeless because it was never a trend to begin with.” It’s been a staple of good design for centuries, constantly evolving while maintaining its core appeal.
Today’s wainscoting styles prove just how fresh and modern this classic feature can be. Board and batten and flat panel styles offer clean, minimalist lines perfect for contemporary homes. Picture frame molding lets us create completely custom designs that work with any decorating style, from traditional to ultra-modern.
We’re also seeing exciting innovations in color and application. Bold, dramatic colors on wainscoting create stunning focal points. Monochromatic schemes offer sophisticated elegance. Some homeowners even use “feign-scotting” – creating the look with paint alone for a budget-friendly twist.
The beauty of wainscoting lies in its versatility. Whether you love farmhouse charm, modern minimalism, or classic elegance, there’s a style and approach that will improve your home’s character while adding lasting value.
Conclusion: Lift Your Home with Timeless Elegance
Wainscoting truly is one of those rare home improvements that delivers on multiple fronts – beauty, function, and value. As we’ve finded together, this isn’t just about following a design trend. We’re talking about adding a piece of architectural history to our homes, one that has stood the test of time for good reason.
Think about it: from its humble beginnings protecting medieval walls from cold and damp to today’s stunning design statements, wainscoting has never really gone out of style. It simply adapts and evolves with our changing tastes. Whether we choose the formal elegance of raised panels, the clean simplicity of flat panel designs, the cozy charm of beadboard, or the versatility of picture frame molding, we’re investing in something that will look beautiful for decades to come.
The numbers speak for themselves too. With installation costs averaging between $1,050 and $1,600, we’re looking at a relatively modest investment that can significantly boost our home’s appeal and market value. The durability factor alone makes it worthwhile – especially in those high-traffic areas where walls take a beating from daily life.
What really excites us is how accessible this upgrade has become. With materials ranging from budget-friendly MDF at $1 per square foot to premium solid wood options, there’s a wainscoting solution for virtually every budget. And for those weekend warriors among us, many styles are completely DIY-friendly, making this neat upgrade even more affordable.
At Your Guide to Real Estate, we see how thoughtful improvements like wainscoting can transform a property’s marketability. It’s those architectural details that make potential buyers stop and take notice. They signal quality, care, and character – exactly what today’s homebuyers are seeking.
The beauty of wainscoting lies in its versatility. It works equally well in a formal dining room or a cozy bathroom, a busy hallway or a peaceful bedroom. It’s one of those rare features that can make a new home feel established or give an older home a fresh, updated look.
Ready to explore how strategic home improvements can boost your property’s value and market appeal? Learn more about navigating the real estate market with our expert guidance.


")