

Why Ceiling Fan Installation Mistakes Can Cost You Time, Money, and Comfort
Ceiling fan installation is one of the most rewarding home improvement projects you can tackle. When done right, it boosts your home’s comfort, reduces energy bills, and adds value to your property.
Quick Ceiling Fan Installation Overview:
- Time needed: 1-3 hours for experienced DIYers, 2-4 hours for beginners
- Cost: $100-$300 for professional installation (fan not included)
- Key requirements: Fan-rated electrical box, proper tools, basic electrical knowledge
- Safety first: Always turn off power at circuit breaker and use voltage tester
- Common mistake: Using wrong electrical box (must support 70+ pounds)
The benefits are clear. Ceiling fans can make rooms feel up to 8 degrees cooler in summer, allowing you to raise your thermostat and save on energy costs. In winter, reversing the fan direction helps circulate warm air more efficiently.
But here’s the catch: small mistakes during installation can lead to big problems. A wobbly fan, electrical issues, or even a fan falling from the ceiling are all real risks when corners are cut.
Many homeowners rush through the planning phase or skip critical safety steps. Others use the wrong electrical box or make wiring errors that create safety hazards. These mistakes don’t just affect performance – they can damage your home and put your family at risk.
The good news? Most installation mistakes are completely avoidable when you know what to watch for.

Key ceiling fan installation vocabulary:
Mistake #1: Rushing Through Planning and Preparation
We get it. You’re excited about your new ceiling fan installation project, and you just want to get that fan spinning as soon as possible. But hold on there, speed racer! The biggest mistake we see homeowners make is skipping the planning phase and diving straight into the installation.
Think of it this way: you wouldn’t start a road trip without checking your map first, right? The same logic applies here. A little preparation upfront can save you from headaches, multiple trips to the hardware store, and potentially dangerous situations later.
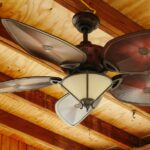
Choosing the Right Fan for Your Space
Here’s where many people go wrong. They fall in love with a gorgeous fan at the store, bring it home, and then realize it’s either too small to move any air or so massive it looks like a helicopter landing pad in their bedroom.
The secret is matching your fan size to your room’s square footage. It’s not just about looks – it’s about getting the airflow you need to actually feel comfortable.
| Room Square Footage | Recommended Fan Blade Size |
|---|---|
| Up to 144 sq ft | 42-inch fan |
| Up to 225 sq ft | 44-inch fan |
| Up to 400 sq ft | 54-inch fan |
| Over 400 sq ft | Multiple fans |
Beyond size, think about your fan’s motor quality, blade pitch, and finish. Today’s fans are pretty amazing – they’re energy-efficient, whisper-quiet, and come with cool features like LED lights and remote controls. Consider how your new fan will work with your existing decor, especially if you have special features like wainscoting that you want to complement.
Ignoring Ceiling Height and Type: Downrod vs. Flush Mount
Your ceiling height isn’t just a number – it determines everything about how your fan should be mounted. Get this wrong, and you’ll either have a fan that’s too close to the ceiling (poor airflow) or too low (hello, head injuries).
For standard 8-foot ceilings, a flush mount fan that attaches directly to the ceiling is usually your best bet. This keeps the fan blades at least 7 feet from the floor while maximizing your headroom.
Got higher ceilings? Lucky you! Ceilings 9 feet or taller need a downrod to bring the fan down to the optimal height. The sweet spot is keeping blades at least 7 feet from the floor but no more than 10 inches from the ceiling.
Sloped or angled ceilings are where things get interesting. Most downrod fans can handle angles up to 34 degrees without any special adapters. Steeper angles might need special mounting kits, and some fans can handle up to 45 or even 56 degrees with the right equipment. Just remember – those low-profile “hugger” fans won’t work on angled ceilings at all. When in doubt, check out this guide to installing on angled ceilings for detailed instructions.
Forgetting Essential Tools and Materials
Picture this: you’re halfway through your ceiling fan installation, balanced on a ladder, and you realize you don’t have a voltage tester. Not fun, and definitely not safe.
Before you even think about opening that fan box, gather everything you’ll need. Essential tools include a sturdy ladder, voltage tester, screwdrivers (both Phillips and flathead), wire strippers, pliers, and a fan-rated electrical box. You’ll also want electrical tape, wire nuts, safety glasses, and an adjustable wrench.
Don’t forget about the fan itself and any accessories like light kits or the right length downrod for your ceiling height. Having everything ready means you can focus on the installation instead of running to the store every twenty minutes.

Smart planning now can also set you up for future upgrades. As homes become more connected, you might want to consider fans with smart features that integrate with your home automation system. This forward-thinking approach aligns perfectly with trends like The Smart Home Boom: How PropTech Is Redefining Real Estate in 2025.
Good preparation isn’t just about avoiding mistakes – it’s about setting yourself up for a smooth, successful installation that you’ll be proud of for years to come.
Critical Electrical and Mounting Mistakes During Your Ceiling Fan Installation
This is where things get serious. The electrical and mounting phases of your ceiling fan installation aren’t just about getting things to work – they’re about keeping you and your family safe. We’ve seen too many horror stories of fans crashing down or electrical mishaps that could have been easily avoided.
Let’s walk through the critical mistakes that can turn your weekend project into a dangerous situation.
Forgetting Essential Safety Precautions
Here’s the truth: electricity doesn’t forgive shortcuts. Before you even think about touching a single wire, you need to completely disconnect the power. Not just flip the wall switch – we’re talking about a complete electrical shutdown.
Start at your circuit breaker. Head to your home’s electrical panel and locate the breaker controlling your work area. If you’re not sure which one it is, don’t guess. Turn off the main breaker for the entire house. Yes, it’s inconvenient, but it’s better than a trip to the emergency room.
Never trust the breaker alone. Once you think the power is off, grab your voltage tester and check the wires in the electrical box. Touch the tester to each wire – if it lights up or beeps, there’s still power flowing. Double-check your breakers and test again.
Secure that wall switch in the off position. Tape it down or put a note on it. You don’t want someone helpfully “fixing” the lights while you’re working overhead.
If you’re curious about how your electrical system works, this DIY Basics video: What’s in My Breaker Box? is a great starting point.
Using the Wrong Electrical Box
Here’s where many DIYers make a costly mistake. That standard plastic electrical box that held your old light fixture just fine? It’s not going to cut it for a ceiling fan.

Ceiling fans are heavy and they move. Even a basic fan weighs 15-50 pounds, and when it’s spinning, it creates vibration and dynamic forces. A standard electrical box simply isn’t designed for this kind of stress. Over time, the mounting will loosen, and eventually, your fan could come crashing down.
Look for the magic words on your electrical box: “Acceptable for Fan Support” or “Rated for 70 lbs.” If you don’t see these markings, you need to replace the box. Fan-rated boxes are typically metal and have deeper, stronger mounting points.
Replacing the box isn’t optional – it’s a safety requirement. You’ll need to remove the old box and install a new fan-rated one directly into a ceiling joist using 2-inch wood screws. If your box sits between joists, install an expandable ceiling fan brace between the joists first, then mount your fan-rated box to that brace.
Common Wiring Errors in a Ceiling Fan Installation
Wiring mistakes can range from annoying (your fan doesn’t work) to dangerous (electrical fires or shocks). The good news is that most ceiling fan installation wiring follows simple color-coding rules.
Black connects to black – this is your main power wire. White connects to white – this is your neutral wire. Green or bare copper connects to green or bare copper – this is your ground wire, which also connects to the grounding screw in your electrical box.
The blue or red wire is where things get interesting. This usually controls the light kit. If you have a single switch, both the fan’s black wire and blue wire typically connect to the black household wire. If you have dual switches (one for the fan, one for the lights), the blue wire connects to the red household wire.
Secure every connection with wire nuts. Twist the matching wires together clockwise, then twist the wire nut over them until it’s snug. Give each wire a gentle tug to make sure it’s secure – loose connections create heat and fire hazards.
Don’t guess at dual-switch configurations. If you have two switches controlling your old fixture, you likely have both black and red wires in your ceiling box. This setup lets you control the fan and lights independently, which is incredibly convenient once it’s wired correctly.
Need a visual guide for making solid wire connections? Check out this helpful video: How Do I Connect Two Wires?.
There’s no shame in calling a professional if the wiring seems overwhelming. A properly installed fan will serve your home for years, while a poorly wired one creates ongoing safety risks.
Assembly Errors That Cause Wobbling, Shaking, and Noise
You’ve conquered the electrical work and gotten the mounting just right – congratulations! But don’t celebrate just yet. The assembly phase is where many ceiling fan installation projects go from “almost perfect” to “why is this thing shaking like a paint mixer?”
The truth is, assembly errors are sneaky. Everything might look right, but one loose screw or misaligned blade can turn your peaceful ceiling fan into a noisy distraction that keeps you awake at night.

Improperly Attaching the Fan Blades
Here’s where patience really pays off. We know you’re excited to see your new fan spinning, but rushing through blade attachment is asking for trouble.
Start with the brackets first. Most fans require you to attach the blade brackets (those metal arms) to each individual blade before connecting anything to the motor. This might seem backwards, but trust the process. Use the screws that came with your fan – they’re specifically sized for the job.
Get the orientation right from the start. Fan blades typically have two different finishes – one side might be oak while the other is cherry, for example. Pick which side you want facing down and stick with it for every blade. Mixing orientations doesn’t just look odd; it can actually affect airflow and balance.
When you’re ready to attach the blade assemblies to the motor housing, tighten each screw firmly but don’t go crazy. Over-tightening can strip the threads, which means you’ll have a loose connection that can’t be fixed properly. Under-tightening is just as bad – those blades need to be rock-solid.
Check your work twice. Before you move on, give each blade a gentle wiggle. If there’s any movement at the connection points, you’ve got loose hardware that will definitely cause problems once the fan starts spinning.
Skipping the Crucial Step of Balancing After Your Ceiling Fan Installation
Even with perfect installation, your fan might still wobble slightly. Don’t panic – this is actually pretty common and totally fixable.
Watch for the telltale signs. Turn your fan on at medium speed and step back. A properly balanced fan should spin smoothly without any visible wobbling. If you see the fan moving up and down or side to side, or if you hear rhythmic clicking or tapping sounds, you’ve got a balance issue.
The balancing kit is your friend. Most ceiling fans come with a small balancing kit that includes clips and weights. The process is surprisingly simple – you clip a weight to the edge of one blade, run the fan, and see if the wobble improves. If it does, you’ve found your problem blade. Move the clip along that blade until you find the sweet spot where the wobble disappears, then attach the permanent weight.
Don’t skip the basics first. Before you start adding weights, double-check that every single screw is properly tightened. We’ve seen countless “balance problems” that were actually just one loose screw on a blade bracket. Start from the mounting bracket and work your way out to each blade tip, checking every connection.
Test at all speeds. A fan might run smoothly at low speed but wobble at high speed, or vice versa. Run your fan through all its settings to make sure the balance holds across the board.
A little patience during assembly saves you from weeks of annoying wobbles and noise. Your future self will thank you for taking the time to get it right the first time.
When to Skip the DIY and Hire a Professional
Let’s be honest – there’s something deeply satisfying about completing a ceiling fan installation with your own two hands. But sometimes, the smartest thing you can do is recognize when a project is beyond your comfort zone or skill level.
We’ve all been there. You start a project thinking “how hard can this be?” only to find yourself three hours in, covered in drywall dust, with wires that somehow multiplied when you weren’t looking. There’s no shame in calling for backup.
Signs You Need a Pro
No existing wiring is the biggest red flag for DIY installation. If you’re dreaming of a ceiling fan in a room that doesn’t currently have a light fixture or any electrical connection, you’re looking at running new wiring from your electrical panel. This means opening walls, routing cables through tight spaces, installing new switches, and making sure everything meets local electrical codes. Unless you’re a licensed electrician, this is definitely professional territory.
Very high or complex ceilings present their own challenges. We’re talking about cathedral ceilings, vaulted spaces, or anything over 10-12 feet high. Professional installers have the specialized ladders, scaffolding, and safety equipment to work at these heights safely. They also know how to maneuver a heavy fan into position when you’re working 15 feet off the ground.
If you’re uncomfortable with electrical work, please don’t push through the anxiety. Electrical mistakes can cause fires, shocks, or worse. There’s no project worth risking your safety. If the thought of identifying hot, neutral, and ground wires makes you nervous, a professional installation is money well spent.
Some older, heavy fans can be particularly challenging to remove and replace. These ornate, cast-iron monsters from decades past often require two people and specialized lifting techniques just to get them down safely.
The typical cost for professional ceiling fan installation ranges from $100 to $300, not including the fan itself. This varies based on your location, the complexity of the job, and whether new wiring is needed. Most professionals can complete the installation in 2-4 hours, with simpler jobs taking as little as one hour.
What to Ask a Ceiling Fan Installer Before Hiring
When you decide to hire a professional, asking the right questions upfront can save you headaches later. Think of it like interviewing a potential employee – you want to make sure they’re the right fit for your project.
License and insurance verification should be your first question. A legitimate installer will happily provide proof of their electrician’s license and liability insurance. This protects you if something goes wrong during the installation.
Experience with your fan type matters more than you might think. Smart fans, fans with complex light kits, or unusual mounting situations all have their quirks. An installer who’s worked with your specific brand or type will spot potential issues before they become problems.
Written quotes are non-negotiable. You want a detailed breakdown that includes labor costs, any additional materials like a new electrical box or mounting brace, and whether disposal of your old fixture is included. Vague estimates often lead to surprise charges later.
Work guarantee or warranty shows an installer stands behind their work. Reputable professionals will offer some kind of warranty on their labor, giving you peace of mind that they’ll make things right if issues arise.
Disposal of old fixtures might seem like a small detail, but it’s worth clarifying upfront. Some installers include removal and disposal of your old fan in their quote, while others charge extra. Know what you’re paying for before they start working.
A good installer will also ask you questions about your electrical setup, ceiling type, and fan specifications. This back-and-forth conversation helps ensure they come prepared with the right tools and materials for your specific situation.
At Your Guide to Real Estate, we know that smart home improvements like ceiling fans can boost both comfort and property value. Sometimes the smartest investment is hiring a professional to do the job right the first time.
Frequently Asked Questions about Ceiling Fan Installation
We’ve covered the major pitfalls and best practices, but let’s address the questions that keep popping up in our conversations with homeowners tackling ceiling fan installation. These are the real-world concerns that matter most when you’re standing in your living room, fan box in hand, wondering what you’ve gotten yourself into.
How much does it cost to have a ceiling fan installed?
Here’s the straight answer: professional ceiling fan installation typically runs $100 to $300 for labor alone. Your fan isn’t included in that price, so factor that into your budget planning.
What drives the cost up or down? Location plays a big role – what you’ll pay varies by region, though most areas fall within this range. Complexity is the bigger factor though. If you’re swapping out an existing light fixture with proper wiring already in place, you’re looking at the lower end of that scale.
But if your project needs new wiring run from the electrical panel, a new fan-rated electrical box, or you’re dealing with exceptionally high ceilings, expect to pay toward the higher end. Some complex smart fans or oversized units might also bump up the price slightly.
The smart move? Always get a written quote from a licensed professional. No surprises, no awkward conversations about unexpected costs halfway through the job.
Can I install a ceiling fan where a light fixture is?
Absolutely! This is actually the most common ceiling fan installation scenario we see. Most homeowners are replacing an existing light fixture, which makes perfect sense – you get both lighting and air circulation in one upgrade.
But here’s where many people trip up: not all electrical boxes are created equal. That light fixture hanging there now? It’s probably supported by a standard electrical box that’s perfectly fine for a 5-pound light but completely inadequate for a 35-70 pound ceiling fan that’s constantly moving.
You must verify the existing box is fan-rated and properly attached to a ceiling joist or structural brace. If you see a small plastic box or something that looks flimsy, it needs to be replaced before you hang that fan. This isn’t optional – it’s a safety requirement that could prevent your new fan from literally falling on someone’s head.
The good news is that if the wiring is already there and you just need to swap the box, it’s a manageable upgrade that sets you up for a successful installation.
How long does it take to install a ceiling fan?
The honest answer depends on what you’re starting with and your comfort level with home projects.
If you’re replacing an existing fixture with proper wiring and a fan-rated box already in place, you’re in luck. An experienced DIYer can knock this out in 1-2 hours, while a professional might finish in as little as 1 hour. It’s surprisingly straightforward when everything’s already set up correctly.
When new wiring or electrical box replacement is needed, the timeline stretches considerably. DIYers should plan on 3-4 hours or more, especially if you’re learning as you go. Professionals typically handle these more complex installations in 2-4 hours, depending on access and any surprises hiding in your walls or ceiling.
Your skill level matters too. If this is your first electrical project, give yourself plenty of time and don’t feel pressured to rush. A leisurely afternoon spent doing it right beats a frantic evening trying to fix mistakes.
Complex fans with elaborate light kits, smart features, or unique assembly requirements might add some time, but the basic process remains the same. The key is never rushing through safety steps, no matter how long it takes.
Conclusion: A Smooth Installation for a More Comfortable Home
There’s something deeply satisfying about flipping the switch on a ceiling fan installation you’ve completed yourself – watching those blades spin smoothly and feeling that perfect breeze without a hint of wobble or noise. It’s a reminder that with the right knowledge and careful attention to detail, you can transform your home’s comfort and value.
Throughout this guide, we’ve walked through the most common mistakes that can turn an exciting home improvement project into a frustrating ordeal. From the importance of proper planning and choosing the right fan size for your space to the critical safety steps that protect you and your family during electrical work.
We’ve seen how using the wrong electrical box can lead to dangerous failures, and how simple assembly errors create those annoying wobbles that make you question your DIY skills. But here’s the encouraging truth: every single one of these mistakes is completely preventable when you know what to watch for.
Whether you decide to tackle the ceiling fan installation yourself or hire a professional, understanding these potential pitfalls gives you the confidence to make the right choice for your situation. There’s no shame in calling a pro when the job requires new wiring or involves challenging ceiling configurations – knowing your limits is actually a sign of wisdom.
A properly installed ceiling fan does more than circulate air. It becomes part of your home’s character, enhancing both comfort and visual appeal while potentially reducing your energy costs. When guests comment on how comfortable your home feels, you’ll know you made the right investment.
At Your Guide to Real Estate, we’re passionate about helping you create spaces that truly work for your lifestyle. A successful ceiling fan installation is just one piece of the puzzle in building the home you love living in.
Ready to tackle more home improvement projects? Explore more home improvement tips for agents and homeowners and find how small changes can make a big difference in your home’s appeal and value.


")