
Why Wiring a Light Switch is a Perfect DIY Starting Point
Learning how to wire a light switch is one of the best entry points for DIY electrical work. It’s a simple project that can boost your home’s value while building your confidence with basic electrical tasks.
Quick Answer: How to Wire a Light Switch
- Turn off power at the circuit breaker
- Remove the old switch and note wire connections
- Connect wires – ground to green screw, hot wires to brass screws
- Install the switch back into the electrical box
- Test your work by turning power back on
As one expert puts it: “Wiring a new light switch is a great entry point for DIY electrical work. A single pole switch is the simplest component in a house’s electrical system.”
Why tackle this project yourself?
- Save money on electrician calls for simple switches
- Build valuable skills for future home improvements
- Increase home value with updated electrical fixtures
- Gain confidence for more complex DIY projects
A single-pole switch has just two positions – on and off. When it’s on, the circuit is “closed” and electricity flows to your light. When it’s off, the circuit is “open” and power stops flowing. It’s that simple.
The whole project takes under 2 hours and requires basic tools you probably already own. With proper safety precautions and the right steps, even beginners can wire a light switch successfully.

How to wire a light switch terms explained:
Before You Begin: Safety, Tools, and Basics
Before we jump into how to wire a light switch, let’s take a moment to set ourselves up for success. Think of this as laying the groundwork for a project that’ll boost your confidence and your home’s value. The key to any successful electrical project isn’t just knowing which wire goes where—it’s respecting the power you’re working with and having the right tools at your fingertips.
Safety Precautions: Your Number One Priority
Here’s the thing about electricity: it doesn’t give second chances. Even a simple light switch replacement deserves your full attention and respect. The good news? Following a few essential safety steps will keep you safe while you tackle this rewarding DIY project.
Turn off the power at the circuit breaker before you even think about touching a wire. Head to your electrical panel and flip the breaker that controls your light switch to the “OFF” position. Not sure which one it is? It’s perfectly fine to turn off the main breaker and work in sections of your home—safety beats convenience every time.
Here’s a pro tip that could save your life: always use a non-contact voltage tester to confirm the power is truly off. Even experienced electricians double-check this step. Touch the tester to the wires in your switch box. If it beeps or lights up, there’s still power flowing, and you need to find the right breaker.
Use insulated tools whenever possible, and make sure both you and your work area are completely dry. Water and electricity make terrible roommates, so keep them separated.
Essential Tools and Materials
You don’t need a truck full of professional equipment to wire a light switch successfully. A few quality tools will get the job done safely and efficiently.

Your toolkit should include a non-contact voltage tester (your safety guardian), Phillips and flat-head screwdrivers for removing faceplates and tightening terminals, and wire strippers for preparing clean wire connections. You’ll also want needle-nose pliers for bending wires into proper loops and a new single-pole switch rated for your circuit’s amperage.
Don’t forget electrical tape for wire identification and wire nuts if you need to splice connections together. Most of these tools are household basics you might already own.
Basic Components and Principles of Electrical Wiring
Understanding your home’s electrical wiring is simpler than you might think. Every wire has a specific job, and they follow a color-coded system that makes identification straightforward.
The hot wire (usually black) carries electricity from your electrical panel to the switch and then to your light fixture. Think of it as the delivery truck bringing power where it needs to go. The neutral wire (usually white) completes the circuit by carrying electricity back to the panel—like the return trip home.
The ground wire (green or bare copper) is your safety net. If something goes wrong, it provides a safe path for electricity to flow directly to the earth, protecting you from shocks and preventing fires. Most switches have a green screw specifically for this important connection.
A single-pole switch is beautifully simple. It has two positions—on and off—and controls your light from one location. When you flip it on, the circuit closes and electricity flows. Flip it off, and the circuit opens, stopping the power flow. It’s like a drawbridge for electricity, and you’re the bridge operator.
This foundation knowledge will make the actual wiring process feel much more manageable. You’re not just connecting wires randomly—you’re completing a circuit that brings light and functionality to your home.
How to Wire a Light Switch: The 5-Step Guide
Ready to tackle your how to wire a light switch project? We’ll walk through this together, step by step. Don’t worry – thousands of homeowners have successfully completed this project, and you can too. Let’s break it down into five manageable steps that will have your new switch working perfectly.
Step 1: Turn Off Power & Remove the Old Switch
This is where safety becomes your best friend. No shortcuts here – we’re dealing with electricity, and respect for the process keeps everyone safe.
Start by heading to your circuit breaker panel. Each breaker should be labeled to show which area of your home it controls. If yours aren’t labeled (and many aren’t), you’ll need to play a little detective. Flip breakers one by one until the light you’re working on turns off. Once you find the right one, place a piece of tape over it with a note that says “Working on this circuit.”
Now comes the crucial part: testing for power. Even though you flipped the breaker, always verify there’s no electricity flowing. Use your non-contact voltage tester and touch it to the switch and any visible wires. No beeps or lights? You’re good to proceed.
Time to remove the faceplate. Use your flat-head screwdriver to carefully remove the two screws holding the decorative cover. Set these aside somewhere safe – they have a habit of rolling under furniture when you need them most.
Next, you’ll see two screws holding the actual switch to the electrical box. Unscrew the switch and gently pull it out. It’ll still be connected by wires, so don’t yank it. Take a moment here to observe how everything is connected. Snap a quick photo with your phone – this reference can be invaluable if you get confused later.
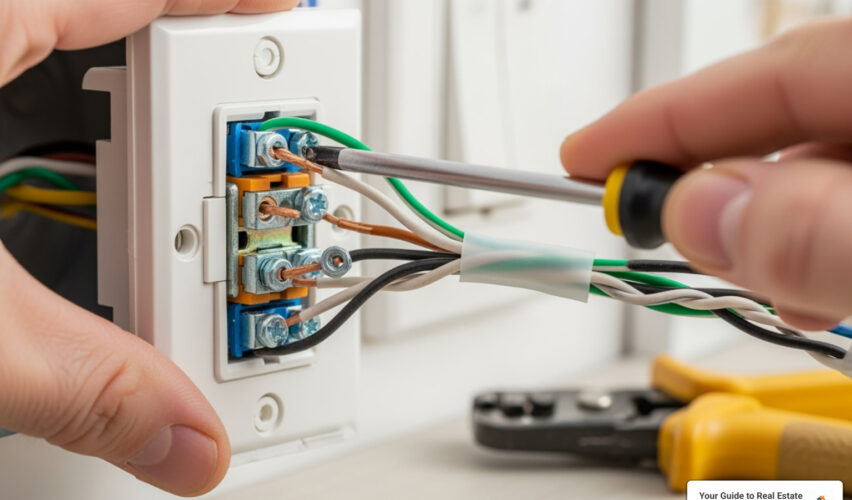
Note the existing wire connections before disconnecting anything. You’ll typically see two black wires attached to brass screws and a ground wire (bare copper or green) connected to a green screw.
Step 2: How to Prepare the Wires for Connection
Good connections start with properly prepared wires. Think of this as laying a solid foundation – it makes everything else easier and safer.

Start by inspecting the wires carefully. Are the ends bent, frayed, or looking a bit worse for wear? If so, we’ll need to trim them back and start fresh. Old, damaged wire ends can create poor connections and potential hazards.
Now for stripping the insulation. Here’s where precision matters. Use your wire strippers to remove about 3/4 inch of insulation from each wire end. You want to expose enough bare copper for a solid connection without exposing too much, which could cause problems later. Be gentle – avoid nicking the actual copper wire underneath.
If your wires look tarnished or dull, take a moment to clean the wire ends with fine sandpaper or the back of your wire strippers. Clean, bright copper makes the best connections.
Finally, create a J-hook for each wire using your needle-nose pliers. Bend the exposed copper into a small hook shape. Here’s a pro tip: make sure your hook faces clockwise. When you tighten the screw later, the wire will pull tighter instead of pushing away from the terminal.
Step 3: How to Connect Wires to a Single-Pole Switch
This is the heart of learning how to wire a light switch. Take your time here – good connections are the difference between a switch that works reliably for years and one that causes problems.

Always start with the ground wire. Take that bare copper or green wire and connect it to the green screw on your new switch. Wrap your J-hook clockwise around the screw and tighten it down securely. This ground connection is your safety net.
Next come the hot wires – those black ones that carry the power. Here’s something that surprises many first-timers: for a standard single-pole switch, it doesn’t matter which black wire goes to which brass screw. The switch simply opens and closes the circuit between these two terminals.
Connect one black wire to one brass screw, wrapping that J-hook clockwise and tightening it down. Then connect the second black wire to the other brass screw the same way. Make sure both connections are snug but don’t overtighten – you don’t want to damage the terminals.
What about those white neutral wires? In most single-pole installations, they simply bypass the switch entirely. If you have white wires in your box, they should be twisted together and secured with a wire nut. They’re creating a continuous neutral path that doesn’t involve the switch at all.
Step 4: Install the Switch into the Electrical Box
With all your connections made, it’s time to tuck everything neatly back where it belongs. This step requires a bit of patience – you’re essentially solving a small puzzle.
Start by folding the wires carefully into the box. Think accordion-style rather than cramming. You want to avoid pinching any wires or putting stress on your newly made connections. Take your time here – rushing this step can damage your work.
Push the switch back into the electrical box, being gentle but firm. Sometimes the wires want to push back out, so you might need to hold them in place while positioning the switch.
Once the switch is seated properly, secure it with the mounting screws. These usually come with your new switch. Tighten them until the switch sits flush with the wall, but don’t overdo it. You want it snug, not stressed.
Finally, attach the cover plate with its two screws. This is the finishing touch that makes everything look professional and complete.
Step 5: Restore Power and Test Your Work
The moment of truth has arrived! This is where you find out if your careful work has paid off.
Head back to your electrical panel and turn the breaker back on. Remove that note you left earlier – you won’t need it anymore. Take a deep breath – you’re almost done.
Now for the fun part: testing the switch function. Flip your new switch on and off several times. Does the light respond reliably? If it does, congratulations! You’ve successfully learned how to wire a light switch.
Don’t skip the final safety check though. Let the switch operate for a few minutes and then feel it gently. A properly wired switch should never feel warm or hot. Listen for any unusual sounds like buzzing or popping. If you notice anything concerning, turn off the power immediately and double-check your connections.
If everything looks, feels, and sounds normal, you’ve completed your first electrical project successfully. That sense of accomplishment? That’s the feeling of becoming a more capable homeowner, one project at a time.
Beyond the Basics: Different Switches and Wiring Scenarios
Once you’ve mastered how to wire a light switch with a basic single-pole setup, you might find yourself wanting to tackle more interesting scenarios. Maybe you’d like to control your porch light from both the front door and the kitchen, or perhaps you’re ready to upgrade to a dimmer switch for mood lighting. Let’s explore these exciting possibilities!
Single-Pole vs. Three-Way and Four-Way Switches
Think about your daily routine for a moment. You flip on the hallway light at one end, walk through, and wouldn’t it be nice to turn it off at the other end without backtracking? That’s exactly what three-way and four-way switches accomplish.
Your single-pole switch is like having one key to your house – it works from one location. It has those two brass terminal screws we worked with earlier, plus the green ground screw. Simple and effective for controlling a light from just one spot.
A three-way switch is where things get more interesting. This allows you to control a single light fixture from two different locations – perfect for staircases, long hallways, or large rooms with multiple entrances. You’ll notice a three-way switch looks different from your single-pole switch. It has three screw terminals plus the ground screw, with that extra terminal being the “common” screw.
The magic happens through traveler wires – these special wires carry the electrical signal between the two three-way switches. In North America, we call these SPDT (Single Pole Double Throw) switches, but electricians commonly refer to them as three-way switches. It’s like having a conversation between two switches about whether the light should be on or off!
For even more control, four-way switches let you control a light from three or more locations. Picture a large living room with entrances from the kitchen, hallway, and patio – you’d use two three-way switches at the “ends” and four-way switches in between. A four-way switch has four hot terminals plus ground and acts like a traffic director, routing the signal between pairs of traveler wires.
The wiring gets more complex with these multi-location setups because you need to carefully identify the incoming hot wire, the wire going to the light fixture, and those traveler wires connecting the switches. If you’re ready to dive deeper into these advanced configurations, this video provides excellent visual guidance: The CORRECT way to wire a light switch – YouTube.
Special Cases: Dimmers and “Hot” White Wires
Sometimes you’ll encounter situations that make you scratch your head and wonder, “Wait, this doesn’t look like what I just learned!” Don’t worry – these special cases are more common than you might think.
Dimmer switches are fantastic for creating ambiance and saving energy. The good news? They wire very similarly to your standard single-pole switch. The main difference is that most dimmers come with their own short wires (called “pigtails”) already attached, rather than screw terminals.
Instead of wrapping wires around screws, you’ll connect the dimmer’s black wire to your incoming hot wire, the dimmer’s other black wire to the wire going to your light fixture, and the green wire to your ground – all using wire nuts. It’s like making electrical handshakes instead of using screw terminals. Just make sure your dimmer is compatible with your light type – LED bulbs need LED-compatible dimmers, for example. For more detailed information about dimmers, check out this resource: Dimmers.
Now, here’s where things can get tricky. In some homes, especially older ones, you might encounter what’s called a “switch loop” configuration. Picture this: the electrical power enters at the light fixture first, then a cable with just two wires (black and white) runs down to the switch location.
In this setup, that white wire isn’t acting as a neutral – it’s actually carrying hot power down to the switch! The black wire then carries the switched power back up to the light. This breaks our normal color-coding rules, so electrical codes require us to re-identify that white wire.
The solution is simple but important: wrap the ends of that white wire with black or red electrical tape wherever it’s visible. This tells anyone working on the circuit later, “Hey, I know I’m white, but I’m actually carrying hot power!” Think of it as giving the wire a new identity badge. This small step prevents confusion and potential safety hazards down the road.
These special scenarios might seem intimidating at first, but they follow the same basic principles we’ve already covered. The key is taking your time to understand what each wire is doing before making any connections.
Troubleshooting and Professional Help
Let’s be honest – even with the clearest instructions, sometimes things go sideways when you’re learning how to wire a light switch. Maybe the light won’t turn on, or worse, something starts sparking. Don’t worry! Most issues have simple solutions, and knowing when to troubleshoot versus when to call in the cavalry can save you time, money, and keep you safe.
Common Light Switch Problems and Solutions
That moment when you flip your newly wired switch and… nothing happens. We’ve all been there! Before you start second-guessing your electrical skills, let’s walk through the most common culprits.
When your light doesn’t turn on, start with the obvious stuff. Check the bulb – is it screwed in tight? Is it actually working? Sometimes the simplest answer is the right one. Next, double-check that the circuit breaker is still in the “ON” position. Breakers can sometimes trip during electrical work.
If those basics check out, it’s time to inspect your connections. Turn off the power at the breaker first (always!), then carefully remove the switch to examine your work. Are all the wire connections tight? Is any wire loose from its terminal? Look for any bare copper touching other wires or the metal box, which could cause a short circuit. Sometimes it’s just a matter of tightening a screw that worked loose.
Switch sparking or making popping noises is your electrical system’s way of saying “Help!” This is serious business. Immediately turn off the power at the breaker panel. These symptoms usually point to loose connections or short circuits. Check every terminal to ensure wires are securely fastened, and look for any stray wire strands touching something they shouldn’t.
A warm switch might seem minor, but it’s worth investigating. While dimmers can run slightly warm, and switches controlling high-wattage loads might generate some heat, an uncomfortably warm or hot switch signals trouble. Turn off the power and check your connections – loose terminals create resistance, which generates heat. Also make sure your switch is rated for the electrical load it’s controlling.
If you’ve checked everything twice and problems persist, or if you encounter anything that makes you uncomfortable, it’s time to bring in professional help.
When to Call a Professional Electrician
Here’s the thing about electrical work – there’s absolutely no shame in knowing your limits. Some situations are simply beyond the scope of a DIY project, and recognizing them keeps you and your home safe.
Complex wiring scenarios top the list. If you open up that switch box and find a tangle of wires that looks nothing like our simple diagrams, step back. Three-way switches, four-way switches, or any setup that seems overly complicated deserves professional attention.
Aluminum wiring is another red flag. Common in homes built between the mid-1960s and mid-1970s, aluminum wiring requires special connectors and handling techniques. It tends to oxidize and expand and contract with temperature changes, leading to loose connections and potential fire hazards. This is definitely not DIY territory.
Any signs of fire hazard – persistent sparking, burning smells, smoke, or components that are too hot to touch – require immediate action. Turn off the power and call an electrician right away. Your safety is worth far more than the cost of a service call.
Local code uncertainty can also warrant professional help. Electrical codes vary by region, and what’s acceptable in one area might not fly in another. Licensed electricians stay current with local regulations and can ensure your work meets all requirements.
If your electrical box lacks a ground wire, this indicates older wiring that may need significant upgrades for safety. Modern electrical codes require grounding for good reason, and retrofitting older systems requires expertise.
Finally, trust your gut. If you’re feeling uncomfortable, overwhelmed, or simply not confident about any step of the process, don’t push through. As we always say at Your Guide to Real Estate, making informed decisions about your property – whether it’s electrical safety or choosing professional services – is key to protecting your investment and your family’s well-being.
Frequently Asked Questions about Wiring a Light Switch
After walking countless homeowners through how to wire a light switch, we’ve noticed the same questions come up again and again. Let’s clear up these common confusion points so you can tackle your project with confidence.
What’s the difference between the brass and silver screws on a switch?
Here’s a simple way to remember this: brass screws are for hot wires, silver screws are for neutral wires. On most standard single-pole switches, you’ll see two brass-colored screws on the side – these are where your black (hot) wires connect.
The switch works by interrupting only the hot wire, which is why most simple switches focus on those brass terminals. When you flip the switch to “off,” it breaks the connection between those two brass screws, stopping electricity from flowing to your light.
You might occasionally see silver screws on specialty switches designed to interrupt both hot and neutral wires, but for your basic how to wire a light switch project, just remember: black wires go to brass screws.
Can I use a white wire as a hot wire?
This is where things get interesting! Yes, you absolutely can use a white wire to carry hot current, but there’s a crucial safety rule you must follow.
In older homes or specific wiring setups called “switch loops,” you’ll sometimes find that power comes to the light fixture first, then travels down to the switch through a two-wire cable. In this scenario, the white wire carries the hot power down to the switch, while the black wire brings the switched power back up to the light.
Here’s the critical part: Any white wire used this way must be re-identified as a hot wire. Wrap both ends with black or red electrical tape to signal that this white wire is actually carrying live power. This simple step could save someone’s life down the road when they’re working on your electrical system.
As we mentioned earlier, colored electrical tape really is your best friend for keeping things clear and safe.
Does it matter which black wire goes on which brass screw on a single-pole switch?
Great news – for a standard single-pole switch, it doesn’t matter at all! This is one of those questions that makes people overthink a simple project.
A single-pole switch is basically just an on/off valve. It doesn’t care which brass screw gets the incoming power wire and which gets the outgoing wire to your light. The switch simply completes or breaks the circuit between those two brass terminals.
So go ahead and connect either black wire to either brass screw. Tighten them both down securely, and you’re good to go.
This changes with three-way switches, where specific terminals matter, but for your basic light switch replacement, you can’t mess this up.
Conclusion
You’ve just completed one of the most rewarding DIY projects a homeowner can tackle. Learning how to wire a light switch isn’t just about saving money on electrician calls – it’s about building the confidence and skills that turn you from someone who calls for help into someone who takes charge of their home.
Let’s take a moment to recap what we’ve accomplished together. You’ve learned to prioritize safety above all else by cutting power at the breaker and confirming it’s off with a voltage tester. You’ve mastered the art of preparing wires properly with clean strips and secure J-hooks. Most importantly, you’ve connected those wires with confidence, understanding that the ground goes to green, hot wires go to brass, and everything gets tucked away neatly before testing your handiwork.
But here’s the thing about electrical work – respect and caution should always guide your decisions. If you encountered complex wiring scenarios, older aluminum systems, or simply felt that nagging uncertainty in your gut, calling a professional electrician was absolutely the right choice. There’s no shame in knowing your limits, and sometimes the smartest DIY decision is knowing when not to DIY.
This project represents something bigger than just a functioning light switch. You’ve taken a meaningful step toward becoming a more capable, confident homeowner. Every skill you build adds value – not just to your property, but to your sense of independence and accomplishment.
Your journey in home improvement and real estate doesn’t end here. Whether you’re preparing your home for sale, making strategic improvements, or simply learning to maintain what you own, having trusted guidance makes all the difference. For more expert insights on maximizing your property’s potential and navigating the real estate market with confidence, explore our comprehensive resources: More info about real estate agent services.
Every expert was once a beginner. Today’s successful light switch wiring is tomorrow’s foundation for bigger, bolder home improvement projects.


")